Showing posts with label glutinous rice. Show all posts

Saturday, January 28, 2012

From GastroLab with Love: Pan-fried year cake with eggs (quasi-vegetarian, dessert)


In my previous post, I detailed my first attempt at making a Cantonese year cake using black glutinous rice, regular rice, sugar, and cassia flower.  The cliffhanger at the end may make you wonder what other journey this year cake would take.  Obviously, we all know its final destination (Part toilet, part released as carbon dioxide and water, part converted into energy...), but the journey to the destination is just as fun, and if not more important, than the destination itself (because this is a path function, not a state function damn it!).  For this type of year cake, there are 2 conventional processing options:  pan-fried (see this.  Translated version here.) and fried (see this and this.  Translated versions here and here.  I have to try the taro/sweet potato trick some time because that sounds really good).  My (deceased) grandma, and by extension my mom, both make pan-fried year cake the same way as the pan-fried recipe described.  Childhood nostalgia always taste better than anything else.  

My recipe is pretty much the same way as described in the translated version of pan-fried year cake, though I arrived there via a different path (passed down by my mom, or mostly just by watching her make it over the years).  Here’s a group shot of all the ingredients:  


1 ~4” x 4” x 2” block year cake (I used my black glutinous rice year cake with cassia flower, but you can use store-bought sweet year cake)
1 egg
Approx. 1 tablespoon oil

I used extra virgin olive oil here because that’s what I have on hand.  As a general rule of thumb, you do not use extra virgin olive oil for pan-frying because it has a low smoke point (see here for various oil smoke points.  Pay special attention to ghee, peanut oil, palm oil, coconut oil, and palm oil.  All these oils are commonly used in Asian cuisine and they all have very high smoke points... that’s another post).  

I cut the year cake into several ~2” x 2” x 1/4” pieces, and beat the egg.  Here’s another family photo with everything prep up.  


If you look very closely, you can see the light whitish spots on the year cake.  I was referring to those spots when I talked about the hydration issue in my last post.  

I’m using an electric skillet for this work.  That just happens to be what I had on hand.  As you can see the pan is teflon-coated, but the coating is scratched up.  This may cause sticking.  First, some oil inside a medium-high heat pan...


Next, I dipped the year cake piece by piece into the beaten egg and placed them in the pan.  No pictures for that because I don’t want my phone to get salmonella....  

This shot shows the dipped year cake inside the pan in various flipped states.  
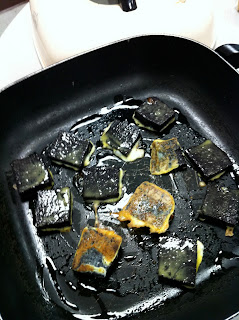


Pieces on the outskirts hadn’t been flipped yet, so they glistened in beaten egg nirvana.  The center pieces had been flipped.  As you can see, flipping forms a nice caramelized egg layer on the bottom.  Some year cake pieces did not adhere too much of the beaten egg though.  This is a common problem.  The adhesion relates to the viscosity of the beaten egg and the year cake’s surface roughness.  The fresh part of the egg whites usually has a higher viscosity than the rest of the egg, so it will cling onto the year cake better.  At the end of the egg-dipping, I had a little bit of beaten egg left, so I just added it right on the year cake in the pan.  I really like extra eggs on my year cake so that worked out really well.  

Here’s the finished shot.  


Because of the beaten egg, the year cake picked up a nice layer of char on top.  The egg provided some extra crunch and caramelized protein flavor to the sweet, chewy contrast of the year cake.  It’s almost as good as fried year cake, although as I mentioned earlier, nostalgia tastes better than fresh experience.  A dash of salt in the beaten egg can bring this concoction to a new level of tastiness.  

Total elapsed time:  about 10 - 15 min  

Bon appetit!

Notes:

1.  You can just pan-fry the year cake, but it won’t taste as good because it won’t pick up char like the egg would.  In my opinion, you cannot skip the egg (sorry true vegetarians...)

2.  As for how long the pan-frying should take, it depends on when the egg is cooked and when the year cake is warmed throughout.  A thicker slice or year cake just out of the fridge will also take a longer time to heat through.  Adjust the heat accordingly so you can get the egg coating to cook and the year cake to heat through.  

3.  I really like a higher egg to year cake ratio, so I cut my year cake a bit thinner at the expense of having less of a chewy center.  That’s a personal preference though, and you can cut it however thick you want, but I wouldn’t go too much more than 1/2” thick due to heat transfer issues.  

4.  I would use teflon pan for this application since it can reduce the amount of oil needed for the dish.  If you’re against teflon, use more oil, and be patient when it comes to flipping.  The pieces should detach from the pan when they are cooked.  

Thursday, January 26, 2012

Mad science at work in the GastroLab: Black glutinous rice year cake with cassia flower-- Part 1 (vegetarian, dessert)


Note:  This entry is more experimental than others.  Proceed at your own risk.  

Happy Chinese New Year again!  As I mentioned in my previous post, Chinese New Year (abbrev. CNY) just happened a couple days ago.  CNY is a big deal for Chinese folks, as it’s one of the times the family gets together to enjoy a feast).  An American (emphasis on American) equivalent would be Christmas (the top spot in terms of family gathering goes to the Winter Solstice in Cantonese culture, which is the equivalent of Thanksgiving to my dear American readers).  As a warning to all readers:  there are many kinds of Chinese (and I don’t mean the People’s Republic of China/Republic of China debacle either), and we all celebrate CNY a little bit differently.  What you see here is how my family runs CNY.  Your mileage may vary.  

In the Hong Konger’s tradition, year cake is sweet, chewy, and usually comes in reddish brown color.  A year cake of this style usually consists of glutinous rice (wiki), brown sugar, and water.  Always on the innovative edge, Hong Kongers have made year cake with coconut milk (making the year cake white), ginger, and probably other flavors.  This year, I decided to make a year cake with black glutinous rice.  Black glutinous rice has a distinct flavor that is different from regular glutinous rice.  Just like how the Supreme Court interprets possible pornographic material, I can’t really describe the flavor difference between regular and black glutinous rice, although I would say the extra flavor from black glutinous rice tastes like malt, if you catch my drift.  After doing some research (Chinese here, English here, and I wish I read this before I made this; mute if you don’t like music;  English here), here’s the ingredient list I settled with with a family photo: 


2 cups black glutinous rice
½ cup white rice
½ bar dark brown sugar, approximately 3 - 4 tablespoons
Approx. 1 tablespoon cassia flower jam (wiki for cassia flower-- they sure aren’t pretty, but they smell really good!)  
Enough water to soak all the rice (save the water for later use.  I ended up using about 1 cup of water in all applications combined)
8 Goji berries (for decoration, optional)
1 dried lotus seed (for decoration, optional)


One of the things I do not like about regular year cake is that it is all chew and very floppy-- no body.  My attempt to address that was to add white rice to the mixture to make the steam cake stand up better.  I figured a 80/20 glutinous rice/regular white rice ratio would be a good starting point.  I’ll have a post-game analysis on what can be improved later.  I like the flavors of dark brown sugar (which contains molasses), so that’s what I used for my sweet component.  Cassia flower has a very sweet but fresh scent, which I think would be a great addition to my year cake.  


As with most recipes with a simple ingredient list, there’s a catch, and it’s technique, technique, technique.  The execution of all the steps is now more crucial than ever.  After consulting my mom on her past experience (failed and otherwise) on making Chinese steam cake, I decided to use as little water as possible because viscosity seems to be a big issue when it comes to making a viable steam cake (and as my work folks know, I know all about viscosity... or not).  


In a regular year cake, glutinous rice is already milled into a fine, white powder, which makes the flour-to-batter conversion much easier.  Since there isn’t black glutinous rice flour easily available for sale, I will have to make my own rice batter with dried rice granules.  


Here’s a close-up shot of the pre-re-hydrated rice.  


I started by soaking all my rice in water.  I figured it would take at least 3 hours for the rice granules to be hydrated.


After 4 hours, I strained the rice out of the water and saved the water for other uses.  The water turns purple, which is expected because the (hopefully!) natural colorant is water soluble (and actually, somewhat heat stable too based on my experience).  


To make the rice batter, I needed some hardware.  I went with a bullet blender (yeah I know it’s crappy... but that’s all I can afford), a sieve, and a pan.  


I started by loading the partially re-hydrated rice into the blender...


Then added a couple tablespoons of water to the rice to make sure it blends.  


Water acts as a “lubricant”, and to some degree, a heat sink in this case.  This prevents my blender motor from burning out.  I reused the water from the rice soak.  It has a good color (and probably some good flavorings too) that I don’t want to waste.  As for how much water, it’s probably 4-6 tablespoons per 1 cup of soaked rice.  I erred on the low side because I can’t take water out, but I can always add.  


Here comes the blend!  I watched the blend very closely because I didn’t want the motor to overheat (again, it’s a cheap blender....), and I wanted to make sure that there was enough water in the mixture to help with the blending.  I also did this in multiple batches to make sure everything got blended.  


Here’s what the mixture looks like after the blending process, already loaded onto the sieve.  


I then started squishing the mixture through.  I started with a spatula initially, then decided to go with my bare (but wrapped in plastic... such contradiction) hand and squished it through the sieve.  Because the viscosity is so high, the hand-mushing was much more effective at pushing materials through than a spatula.  This is equivalent to mushing steamed pumpkin through a sieve to make pumpkin puree.  If I ever make pumpkin puree again, this is my method of choice.  I was squeezing hard, but not so hard that it breaks the sieve.  Here's an action shot:  


As the squishing continued, the viscosity of what was left in the sieve climbed.  After many minutes of mushing, here’s the final result.  


I did not take a picture of what was left in the sieve, but there were some large granules of white rice embedded in a very viscous matrix of rice batter.  So viscous, in fact, that it was pretty much like an air hockey puck (it was about 3” in diameter, and probably 2-5mm in thickness.  All you engineers can do the unit conversion... you don’t need my help here) and I had to throw it out.  


I left the rice batter in the fridge overnight.  Partly because by the time I was done mushing, it was really late and I really needed to go to bed.  The other reason was that I think the rice batter may not have been viscous enough so I need some way to separate the water from the batter.  Refrigeration and natural settling seems to be a better way to go.  


The next step is the syrup.  I dissolved the brown sugar in about ¼ cup of soaking water under heat.  


I then added the cassia flower jam to it and let it boil until the sugar dissolved.  


Sugar is certainly boiling and dissolving here....


After a couple minutes, all the brown sugar dissolved.  Notice the yellow specks in the purple syrup...  those are cassia flower pedals.  


While the syrup was still hot, I added it right into the rice batter and mixed vigorously.  


This shows what the mixture look like before it was smoothed out with the mixing.


Since there wasn’t much syrup to begin with, there wasn’t a big temperature change with the batter.  In a regular rice cake, adding hot syrup would make (by adding liquid) and thicken (unraveling of starch granule and re-gelatinizing the starch via heat) the batter simultaneous. However, the viscosity went down a bit in this case because I added syrup but didn't raise the mixture temperature significantly.  To ensure that I would be getting enough gelatinization, I went with some heat on the stove.  

After 2-3 minutes, the batter thickened considerably.  The bottom of the pan had a visible color change (purple-white to darker purple/purple opaque) which indicated the starch re-gelatinized.  It gelled really quickly-- in fact, it was already gelling when I paused the mixing to take this picture!  


I then loaded the mixture to a 5” spring form pan lined with Saran wrap.  The Saran wrap is there to help with de-panning later.  No need to add oil/other lubrication in this case.  


I then folded over the Saran wrap and pressed the mixture down to the pan using a takeout container lid, which happened to be almost the same size as my small pan.  To create a smoother surface, I took another piece of Saran wrap and placed it right on top of the mixture before the squishing.  


Hulk... needs... smashing... something...


This is what it looked like when it was all pushed down and "evenly" distributed.  


After decorating with the lotus seed and Goji berry, I placed it in a steamer and let it steam for 75 minutes.  I think my year cake was done by the 40 minute mark, but I wanted to make sure so I steamed extra time.  The way to check doneness is first insert a sharp object through the cake, then pull out said sharp object and look. If there's still batter on the object, it needs more time. This is just like checking a baked cake's doneness.


Here’s the final result.  


The cake de-panned really easily, thanks to the Saran wrap.  It was also very stiff, likely thanks to the white rice.  When it first came out of the pan, it pretty much held its own shape.  My mom was very surprised because she said the glutinous rice cakes are usually very floppy when it’s hot off the steamer.  Ruh oh.....


Post-game review:    


Texture-wise:  
The cake has body, but not enough chew.  This is probably due to high content of white rice, low content of water, or combination thereof.  


Flavor-wise:  
It can use more cassia flower scent and maybe a bigger hit on the sugar.  There may not be  enough cassia flower scent to go around, or that I added too early so the scents all volatilized when I was heating the syrup.  I’m leaning toward the former.  As for the sweetness, we probably shouldn’t be eating too sweet anyways.  


Presentation-wise:  
I like the purple hue, but it doesn’t carry a lot of shine, and it still has some pits/holes on the side.  The shine problem is caused by the lack of oil in the recipe, and the pits/holes are caused by not pressing thoroughly enough.  


Inside-wise:  
There seems to be some “dry spots” inside the cake, although the dry spots are limited in size.  If there’s not enough or too much water, the starch would not gelatinize.  The fact that this cake actually stayed as a gelled substance (instead of powder or liquid) indicates that there’s enough for gelation to occur, but maybe I’m on the low end of the water activity window.  


Overall future improvement plans:  
1.  Add less white rice (maybe in the 5-10% range, leaning toward 5%)
2.  Use potato starch, corn starch, or combination thereof at 5% loading instead of white rice
3.  Add slightly more water (say 1 tablespoon) for hydration purposes
4.  Add more cassia flower jam (say another 1 tablespoonful), and add it into the rice batter instead of the syrup so the scent has something more concrete to “bind to”
5.  Add a little bit of oil (maybe 1 tablespoon) into the batter for gloss and shine.  This is the trick them restaurants use to make your saute dishes and congee all shiny looking.  
6.  Instead of soaking the rice and then make a batter, maybe turn the dry rice into flour first then re-hydrate via syrup addition, using the regular year cake method.  However, I think the stirring would be pretty difficult by hand because the batter is very viscous and very heavy, which my mom mentioned the pain thereof when we talked about stirring liquid into rice flour to make the batter.  


I’ll try this again at some point in time (probably next CNY) and implement the change to see if it would make a difference.  


So what do you do with this newly minted year cake? Stay tuned for year cake part 2!